Pre-Design & Values Worksheets

When you sign up to work with us, the first thing we do is give you access to our online Pre-Design and Values Worksheets. Before we begin your custom design, we first need to get to know you and understand your needs and wants for your new home. Our worksheets are comprehensive and cover everything from how many and what type of rooms you would like, to your hobbies and future plans. Our values worksheets are a way for us to understand what is important to you. Do you value privacy, security, frequent entertaining, alone time? Your new home will be designed to compliment your individual lifestyle. Our worksheets not only help us understand your design priorities but they can also help you get clear yourself. We often hear from our clients that filling out our worksheets resulted in new ideas and priorities for their home design that had not occurred to them before.
The Site Visit
With the Pre-Design and Values Worksheets in hand, we travel to your building site for a face to face meeting. The site visit is typically two days, and is a creative and exciting process of discovery and collaboration.
Day 1 - Visit the site and review worksheets
Having previously reviewed your worksheets, we have an idea of what you are looking for in your new home. With this information in mind, the first step is to meet you and walk your building site. We will start to identify aspects of your site that will influence the design of your home. Views, obstructions, street access, trees, site slope, neighboring buildings and potential building sites are all noted. Once we are familiar with your property, it’s time to sit down and talk (maybe over a meal or a drink)! We use the worksheets as a guide to facilitate discussion as we collaborate to develop a direction for the design of your home. Having seen the site, we can start to give you suggestions about how to accomplish the design ideas you mentioned in the worksheets. We will also point out places where difficulties might arise and discuss solutions. This initial discussion gives us the information we need to start working with you to develop a design for your home.
Day 2 - Create And Present Bubble Diagrams
Now that we better understand your vision for your future home and are familiar with your property, it’s time to start sketching ideas. The most important element of a home design is the basic relationship of the rooms to one another, to the building site, and to the sun. The best way to start laying out these relationships is through bubble diagrams (see example below). These are very crude and simple drawings but the information they convey is fundamental to the design of your home. With some simple circles and lines on tracing paper we can begin to discuss the most basic and important aspects of your new home’s design. We consider how to lay the home out on the property, where different rooms are located in relation to one another and to the outdoor spaces, the traffic circulation through the house, the orientation of the spaces to the sun, and much more. The reason we use circles or “bubbles” and not something more closely resembling a floor plan is to keep from getting too specific too soon. It’s important to give thorough consideration to these basic relationships, orientation, and circulation decisions before moving onto more specific details. We can suggest how these details might play out in our conversations, but it’s extremely important not to get ahead of ourselves before considering these fundamental design decisions. 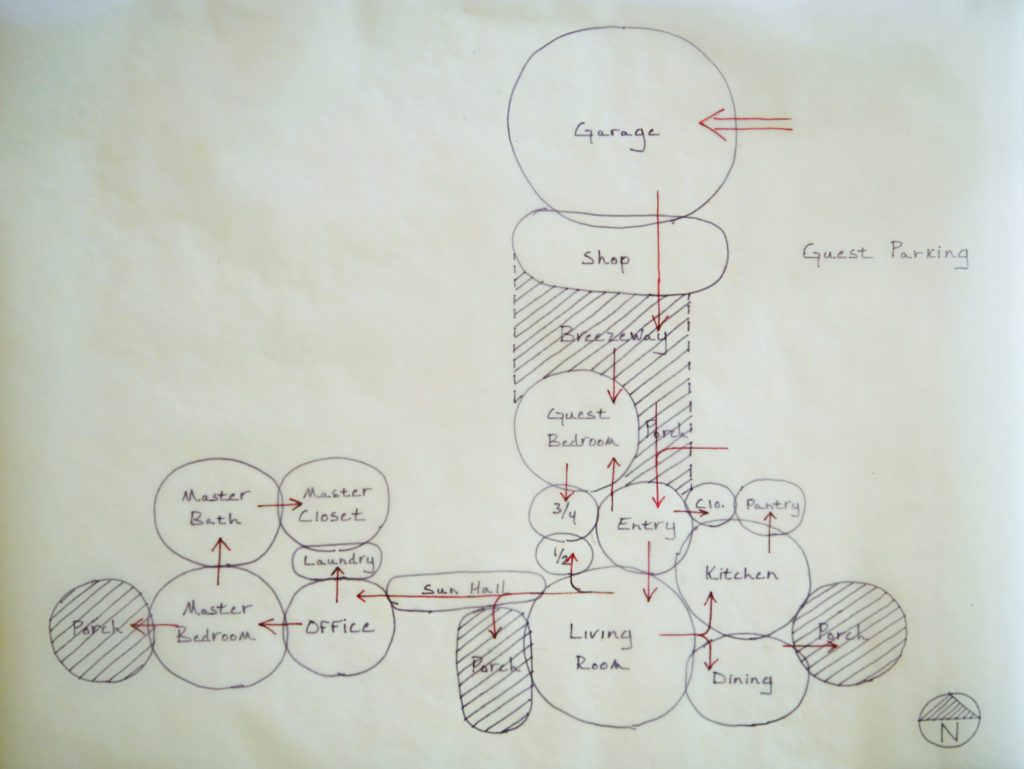 We continue to work on the bubble diagrams after our initial meeting, then the next day, we return to your property and present our bubble diagrams. We lay out our thought process and discuss any realizations we might have had while working on the bubble diagrams. We present our design concept and get your input. Because we have taken the time to get to know you, your goals, and priorities, our clients are often thrilled with our initial sketches. If there is an aspect of the design that doesn’t suit you or another design strategy you would like to discuss, it’s very easy to get out the tracing paper and start sketching other ideas. Upon conclusion of the site visit, our goal is for everyone to be in agreement with the direction we will take as we develop your new home design.
Time To Take The Design Digital
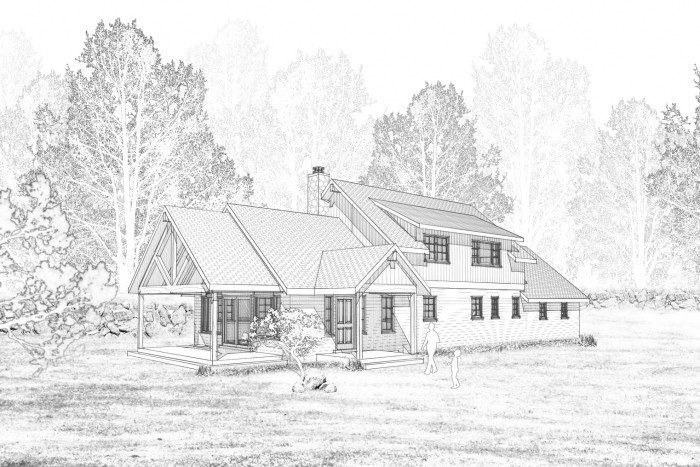
Back at our office we set about translating the bubble diagram into a hard line drawing; a floor plan, elevations, and a 3D model. These drawings will look like a final product but they are far from it! We generate a complete design and 3D model as a starting point, so that you can see how the different design elements relate to each other and give us your input. Just as with the bubble diagrams, it’s important to focus initially on the more basic elements of the design, such as the room sizes, proportions, and the general roof design. Once the basics are looking good we can shift our attention to the more specific details such as the kitchen design or window layout. Eventually we get down to the nitty gritty such as finish choices.
 We end the design process with Design Sign-off which is when you give us your final approval on the plans, elevations, and 3D model. Design Sign-off gives us the go-ahead to create the construction documents that your builder will use to obtain a building permit and build your home.
Two Key Design Leaps
Our design process is purposefully broken up into phases so that we can get your input along the way. We want your regular input so that the design progresses in alignment with your wants, needs and vision for your new home. With this in mind, there are two key leaps that occur in the design process.
The first leap is from a clean slate to a bubble diagram. It seems like a minor sketch, just a few circles on a piece of tracing paper, but what that sketch communicates is profound. This happens at the site visit and we won’t stop working until we have a bubble diagram that we all are completely happy with and feel is a good starting point.
The second big leap is from the bubble diagram to an actual CAD design that includes a floor plan, elevations, and 3D models. We use ArchiCAD, which is state-of-the-art architectural software, and are able to generate accurate, detailed drawings and 3D models from the very start of design and throughout the design process. Want to see what a particular entry porch detail might look like? No problem! Are you curious how different roof pitches or configurations might affect the look of the house? It’s a snap. Using powerful, cutting edge software makes it easy for us to explore different design strategies and quickly provide you with comprehensive, accurate design work that is easy to visualize and understand. This enables you to give us more accurate feedback, which allows us to respond with design improvements that truly fit your needs. We believe that our proficiency with the latest, most powerful and best architectural software is a crucial element in the ultimate success of each custom home we design.
Communication
Good communication throughout design and building is absolutely critical. We communicate through phone calls, email, screen sharing, or video chatting in order to refine the design effectively. These modern communication technologies shrink the distance between us. We have had great success communicating with clients from all over the country throughout the design process and then during construction.
Our 3D Design Software
The software we use, ArchiCAD, is a type of design and drafting software referred to as “BIM”, or building information modeling. In practice, this means that when we draw a wall or roof line, the software creates a 3D digital image instead of just a line. We can then view the design as a 3D image on the computer screen. These 3D images are much easier to understand than the conventional 2D floor plans commonly seen. Because we draw (model) your design in 3D from the beginning, the plans, elevations, and sections are simply views of the 3D model.
During the design process, in response to your feedback, if we bump out a wall, change the proportion of a room or move a window, our software automatically updates the digital model and every page of the drawings to reflect this change. This has two key benefits, the first being that you get to see immediate and comprehensive feedback on your design decisions. The second benefit is excellent quality control, eliminating errors that occur in other software that requires making the changes manually on every page.
Overall Design Timeline
The following is a typical timeline for designing a home with us. This can vary depending on size and complexity of home, the turnaround time of our communications with you, our workload, how often changes are made and other factors. Most of our projects fall within this timeframe, however.
Week 0: Sign a contract with Sunlight Homes and receive the web address for our private, client web site where you can access our Pre-Design and Values Worksheets
Weeks 1-3: Complete and return the worksheets and obtain necessary surveys, and tests. We’ll let you know what you will need.
Week 4: We meet for the Site Visit and work together to determine where your home will sit on the site. We then develop bubble diagrams of room relationships and orientations. At the end of the 2 day Site Visit, we will have a general design concept for your project and a plan for moving forward.
Weeks 5-10: The design is developed incrementally and sent to you for feedback. We respond to your feedback with changes and add detail on each iteration.
The actual time of this part of the process depends on the pace of your decisions and on your ground breaking date. If ground breaking is several months in the future, we would prefer to move at a slower pace to give ideas more time to gestate. We will discuss this with you on an individual basis.
Week 11: The design is usually completed by this time and we will have Design Sign-Off , where you sign the floor plan and elevations indicating your approval of the design and giving us permission to complete the construction documents and drawings.
Weeks 12-13: Final construction documents suitable for a building permit are drafted. (Ask us about the timeframe for your specific project. This can vary.)